What is it and why use it?
Duo is a tool that provides two-factor authentication to better protect your account by requiring an additional piece of information beyond your username and password. When you access CSU services utilizing Duo, you will be required to use a device that you have (your mobile phone, desk phone, a hardware token, or other device) to provide an additional layer of security to your account.

For detailed, step-by-step instructions on how to sign-up/enroll and add a device, please see:
https://it.colostate.edu/cybersecurity/globalprotect-vpn/
There are links at the bottom of the PDF to additional instructions on how to install & register a mobile device.
Please visit Division of IT’s website to get started:
Duo Two Factor Authentication – Information Technology (colostate.edu)
Once you have enrolled in Duo and activated a device and/or phone number, you may use CSU services utilizing Duo, like the GlobalProtect agent or gateway (https://gateway.colostate.edu) to connect to resources on-campus. See How-To’s below.
Please visit the Division of IT’s security website for information about installing and using the GlobalProtect VPN agent:
Finding the full computer name of the computer you want to Remote Desktop to
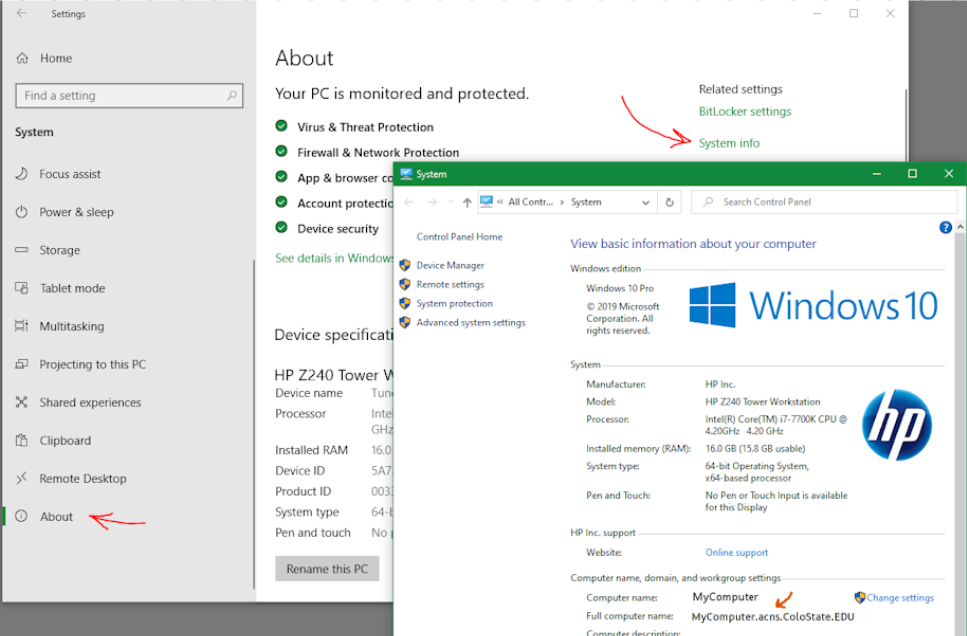
- On the computer you want to remote desktop to, find the full computer name by right-clicking Start and choosing System

- Make sure you’re viewing the About section in the left pane, then look in the right pane for System info (you may need to make the window wider for it to show up).
- Please note the Full computer name as shown in the example below:
Using Microsoft Window’s built-in Remote Desktop
1. Click on Start. Start typing remote desktop and the following should appear:

2. Click on Remote Desktop Connection
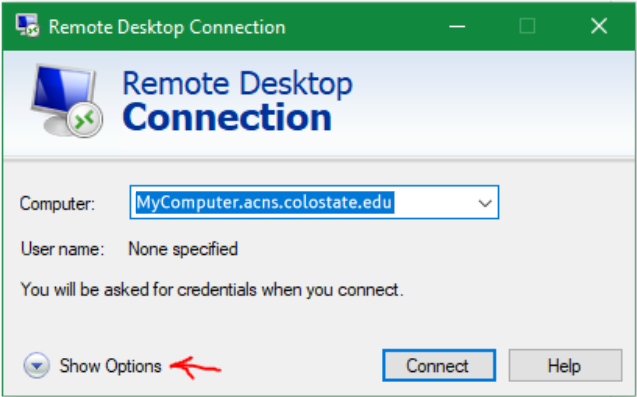
3. Type the full computer name you identified (e.g., MyComputer.acns.colostate.edu) into the Computer field. See step 3 of Finding the full computer name of the computer you want to Remote Desktop above for assistance.
WCNR Students Only: type labcluster16.warnercnr.colostate.edu in the Computer field.
4. Click on Show Options
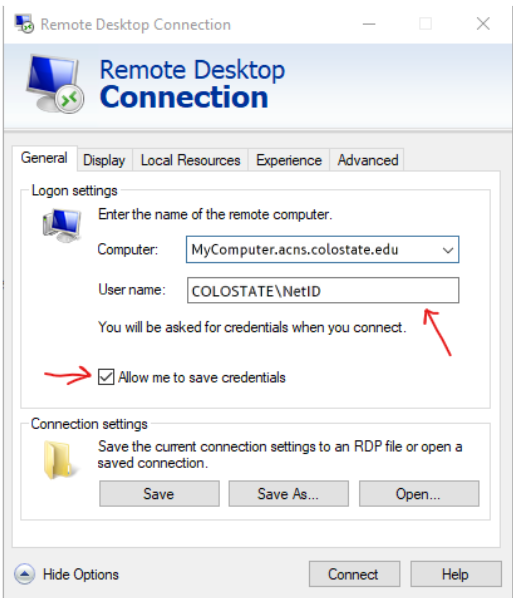
5. Specify your NetID for the User name field formatted as COLOSTATE\NetID
6. Click on the Display tab

7. Adjust the display resolution slider to your preference (all the way to the right will run Remote Desktop full screen).
8. If you have multiple monitors, check the box to Use all of my monitors for the remote session.
9. Click the Connect button.
Using the Remote Desktop app from Microsoft Store (Windows), the Apps Store (iOS/MacOS), or Play Store (Android)
- Get the free Microsoft Remote Desktop app for your device:
- Mac OS – visit the Apps Store and search for/install the Remote Desktop 10 app by Microsoft
- Windows – Click the Get button and choose Open Microsoft Store
- iOS (iPhone/iPad)
- Android/Chromebook
- After the app is installed:
- Windows/Android/Chromebook – tap/click the + in the upper-right corner.
- iOS/MacOS – tap/click the Add PC button.
- Type the full computer name you identified (e.g., MyComputer.acns.colostate.edu) into the PC name field. See step 3 of Finding the full computer name of the computer you want to Remote Desktop above for assistance.
WCNR Students Only: type labcluster16.warnercnr.colostate.edu in the PC name field.
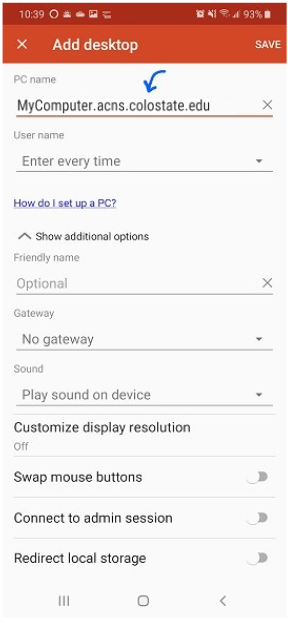
- Tap/click the username list menu and specify your NetID for the Username formatted as COLOSTATE\NetID and your NetID password for the Password, otherwise you’ll be asked for this information every time you launch remote desktop.
- Make sure the Connect to admin session option is DISABLED, then click SAVE in the upper-right corner (Windows/Android), or Add (iOS/MacOS).From now on, you should see a tile listed with your computer name in the main Remote Desktop screen. Simply tap/click it and the Remote Desktop session will launch.
Windows: Mapping the N: drive
- Make sure you have the GlobalProtect VPN agent connected.
- Click the Start button. Start typing map network and the following will appear:

- Click on Map network drive

- For the Drive: letter, choose N:.
- For the Folder: path, type \\acns.colostate.edu\wcnr-network
- Check the box Connect using different credentials and click the Finish button.
- A dialog box will open prompting you to Enter network credentials.
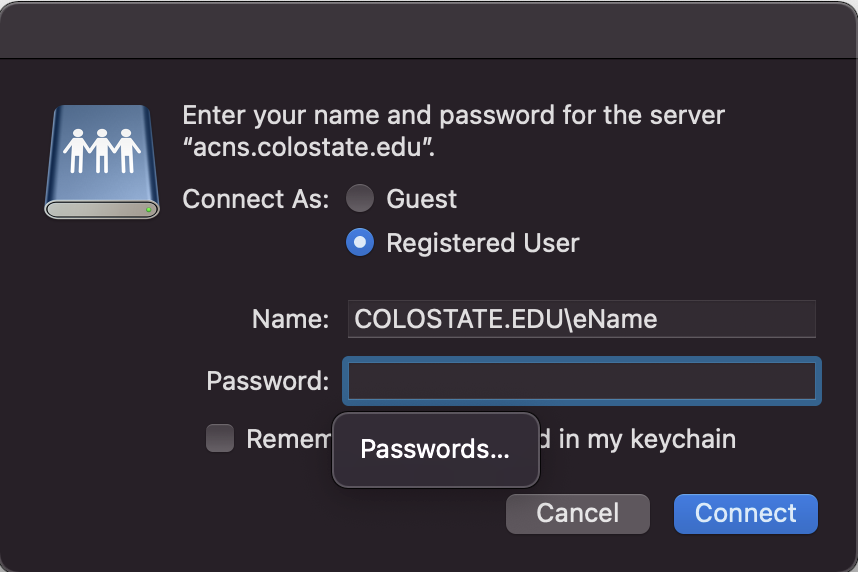
- In the User name field, type COLOSTATE.EDU\NetID (using your NetID!)
- In the Password field, type your ePassword.
- If you’re not using a shared computer, you may check the box to Remember my credentials if you wish.
- Click the OK button.
After some time, the N: drive should show up in File Explorer.
Mac:
- Make sure you have the GlobalProtect VPN agent connected.
- In Finder, choose Go from the menu, then click on Connect to Server…

- Using your NetID, type the following path in the box provided: smb://COLOSTATE.EDU;[email protected]/wcnr-network

- Click the Connect button.
- If prompted, enter your credentials: